
Hidden Cable Management in Custom Media Walls (Done Properly)
Power, HDMI, Ethernet, optical, USB — how a premium media wall routes every cable inside the structure so nothing is visible from the room.
by Walora Design TeamUpdated 10 min read
Cable management is the difference between a media wall that looks like architecture and one that looks like a TV mount. Done properly at fabrication, it's invisible. Done as an afterthought, it's the visible flaw that defines the piece.
What a premium media wall has to route
A typical 2026 setup involves more cables than buyers expect:
- TV power (sometimes also a power strip behind the TV for HDMI devices)
- HDMI from AV receiver / cable box / streaming device → TV (sometimes 3–4 HDMI cables for different sources)
- HDMI ARC from TV → soundbar
- Soundbar power
- AV receiver power and HDMI inputs from sources
- Network cable to TV (Cat6 from router to TV)
- Network cable to streaming device (if separate)
- Optical or USB to subwoofer (if not wireless)
- Speaker cables (if discrete speakers rather than soundbar)
- Smart-home control wires (HDMI-CEC over CAT6, or proprietary)
- AC power for LED drivers (separate from TV/AV power)
- Low-voltage to LED strips
A premium media wall routes all of these inside the wall structure. None of them are visible from the room.
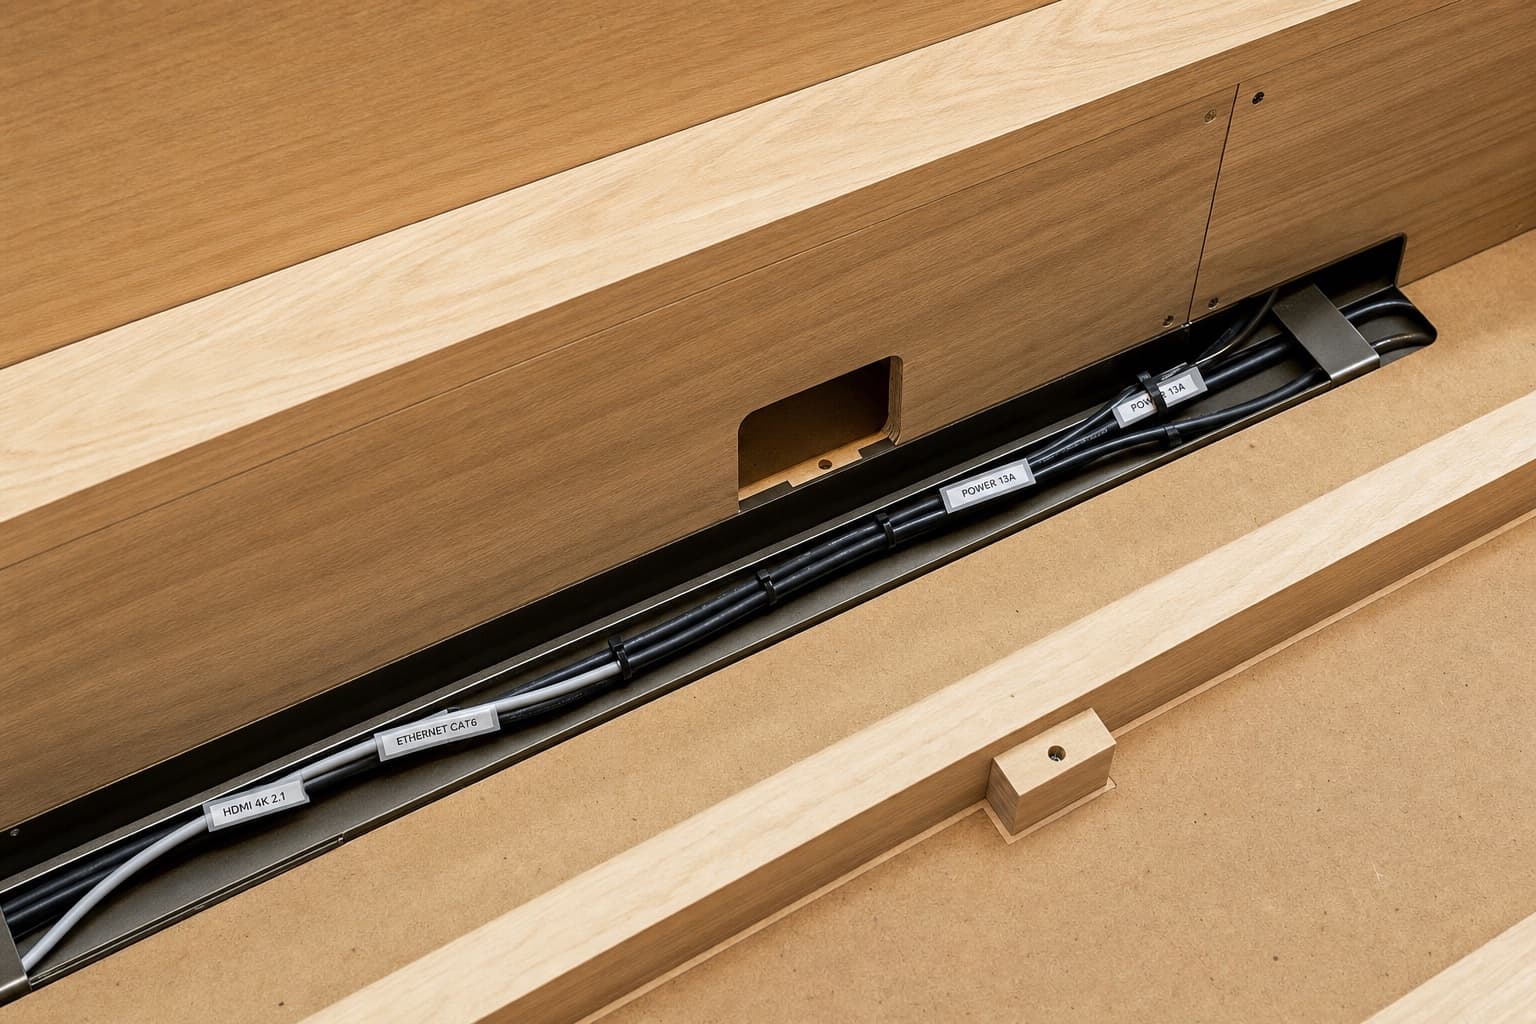
 A service access panel half-open in a media-wall cabinet, revealing a tidy harness of labelled cables.
The four routing zones in a media wall
1. Vertical channel(s) inside the wall
A 25–50mm diameter conduit (or open channel) running from the TV position down to the AV cabinet below. Carries HDMI, power, network, and speaker cables between the TV and the equipment.
Premium walls have at least two vertical channels — one for power, one for signal — to prevent interference between AC power cables and HDMI signal cables.
2. Horizontal trunking inside cabinets
A horizontal cable tray or channel running along the inside top of the AV cabinet, connecting equipment to vertical channels. Allows cables to be moved as equipment changes without re-routing through walls.
3. Rear cabinet cut-outs
Each cabinet that houses equipment has at least one cable cut-out in its rear panel, lined with a rubber grommet. The grommet:
- Prevents cable damage from sharp edges
- Maintains a clean visual when the cabinet is opened
- Acts as a partial dust seal
Cheap installations skip the grommet, leaving cables passing through a rough cut hole. The hole eventually frays cables and looks scrappy when seen.
4. Service access panels
Removable panels (held by magnets or screws) that allow access to the cable routing for future changes. Without these, changing the cable routing requires partial dismantling of the wall.
The cables you should pull during fabrication
Even cables you don't currently use should be pulled during fabrication because pulling them later requires either:
- Cutting the wall (damages finish)
- Routing externally (visible cable)
- Removing a cabinet to access the channel (time-consuming)
A reasonable list of cables to pull during build:
- TV power outlet (inside the wall, near the TV mount position)
- Two HDMI cables (TV to AV cabinet) — even if you only use one now
- One HDMI ARC (TV to soundbar position)
- Cat6 Ethernet (router to TV)
- Optical audio (TV to AV cabinet, in case you upgrade from soundbar to receiver)
- Speaker cable runs (if you might add discrete speakers later)
- AC power to LED drivers
- Low-voltage drops to each LED zone
Pulling all of these adds about AED 300–600 in cable costs during fabrication. Adding any single one later costs AED 800–2,500 in cutting and patching.
The cable that always shows
If you skip nothing else, plan for the HDMI ARC from TV to soundbar. This is the cable that's visible in most retrofit installations because the geometry is awkward — TV at ~110cm, soundbar at ~85cm, so cable has to drop 25cm somewhere.
Three solutions:
- Premium: vertical channel between TV and soundbar positions inside the wall structure, designed at fabrication.
- Workable: route the cable behind a flat veneer or stone panel that masks the run (visually invisible from the room).
- Compromise: a paintable raceway on the wall surface. Visible at conversation distance; passable from across the room.
Option 1 is what premium suppliers build by default. Option 2 is a reasonable middle ground. Option 3 is what budget installations end up with.
What about wireless?
Wireless eliminates some cables but creates new constraints:
- Wireless HDMI kits exist but introduce latency, occasional signal loss, and need power at both ends. Useful for retrofitting an existing room; rarely chosen in a new build.
- Wireless speakers (Sonos, Bose) eliminate speaker cables but still need power. The power cables still need to be hidden.
- Wireless TV (LG and Samsung have wireless-input TVs) eliminates the AV-to-TV cable bundle but adds a separate wireless box that still needs power and HDMI inputs.
Wireless is good at solving the "I forgot to pull this cable" problem after install. It's not a substitute for proper cable management — every wireless system still has power cables to hide.
The maintenance question
A premium media wall is built to allow future cable changes:
- Service loops on every cable
- Removable panels for access
- Spare cables capped for future use
- Cables labelled for identification
A budget media wall is built to look right on day one and is functionally sealed afterwards. Every future change — new TV with different ports, new AV receiver, new streaming device that needs Ethernet — requires either visible workarounds or a partial dismantle.
This is one of those small details that doesn't matter at all until the day you need it, then matters enormously. Premium suppliers build for the change. Cheap suppliers build for the photo.
What to ask your supplier
Before sign-off, confirm:
- Where are the vertical cable channels located?
- How many HDMI cables are being pulled? What version?
- Is there a power outlet inside the wall structure?
- Is Ethernet being run to the TV position?
- Are service loops included on every cable?
- Is there an access panel for future changes?
- How is the TV-to-soundbar cable routed?
A supplier who can answer all of these specifically is building proper cable management. A supplier who answers vaguely ("we'll figure out cables at install") is going to drill holes on the day and route what fits — which is fine for most purposes but is not what premium looks like.
Frequently asked questions
About the author
The Walora Design Team has been crafting custom media walls for UAE homes since 2024 — every piece built to order in our Dubai workshop from real natural stone, premium stained wood veneers and bin-matched LED.
Related reading
Planning Your Space10 min read
TV Sizing Guide: Matching a 65, 75, or 85-Inch Screen to Your Wall
Viewing distance, wall proportions, and the SMPTE / THX guidelines applied to UAE apartment dimensions. How to choose a screen that looks right against the wall and from the sofa.
Planning Your Space9 min read
Soundbar Integration in Custom Media Walls: The Right Way
Three integration approaches: dedicated shelf, recessed flush, or invisible-grille. How to choose, what each costs, and which soundbars work best in each.
Planning Your Space10 min read
How to Measure Your Wall for a Custom Media Unit (Step-by-Step)
A measuring guide good enough to ground-truth a designer's site visit. Tools, sequence, what to record, and the four mistakes that delay 40% of projects.